Of course we want to take you on the journey with us and as the well known saying by Benjamin Franklin goes;
‘If you fail to plan, you are planning to fail’.
We thought we would share the plan we painstakingly constructed at the beginning of this year (2020).
This plan is for the allotment plot,
STAGE 1: THE SUN TRAP
Whilst we were clearing the plot we watched the sun (not literally) but we watched to see which areas stayed the longest in the sun and which areas either saw little sun or had partial shade throughout the day. This is the foundation to how we went about planning.
STAGE 2: WHAT PLANTS GROW IN SUN, PARTIAL SUN, SHADE AND (IN THE UK)
After we knew which are our “full sun” areas and which are our ‘shade’ and ‘partial shaded’ areas we started to think of planting.
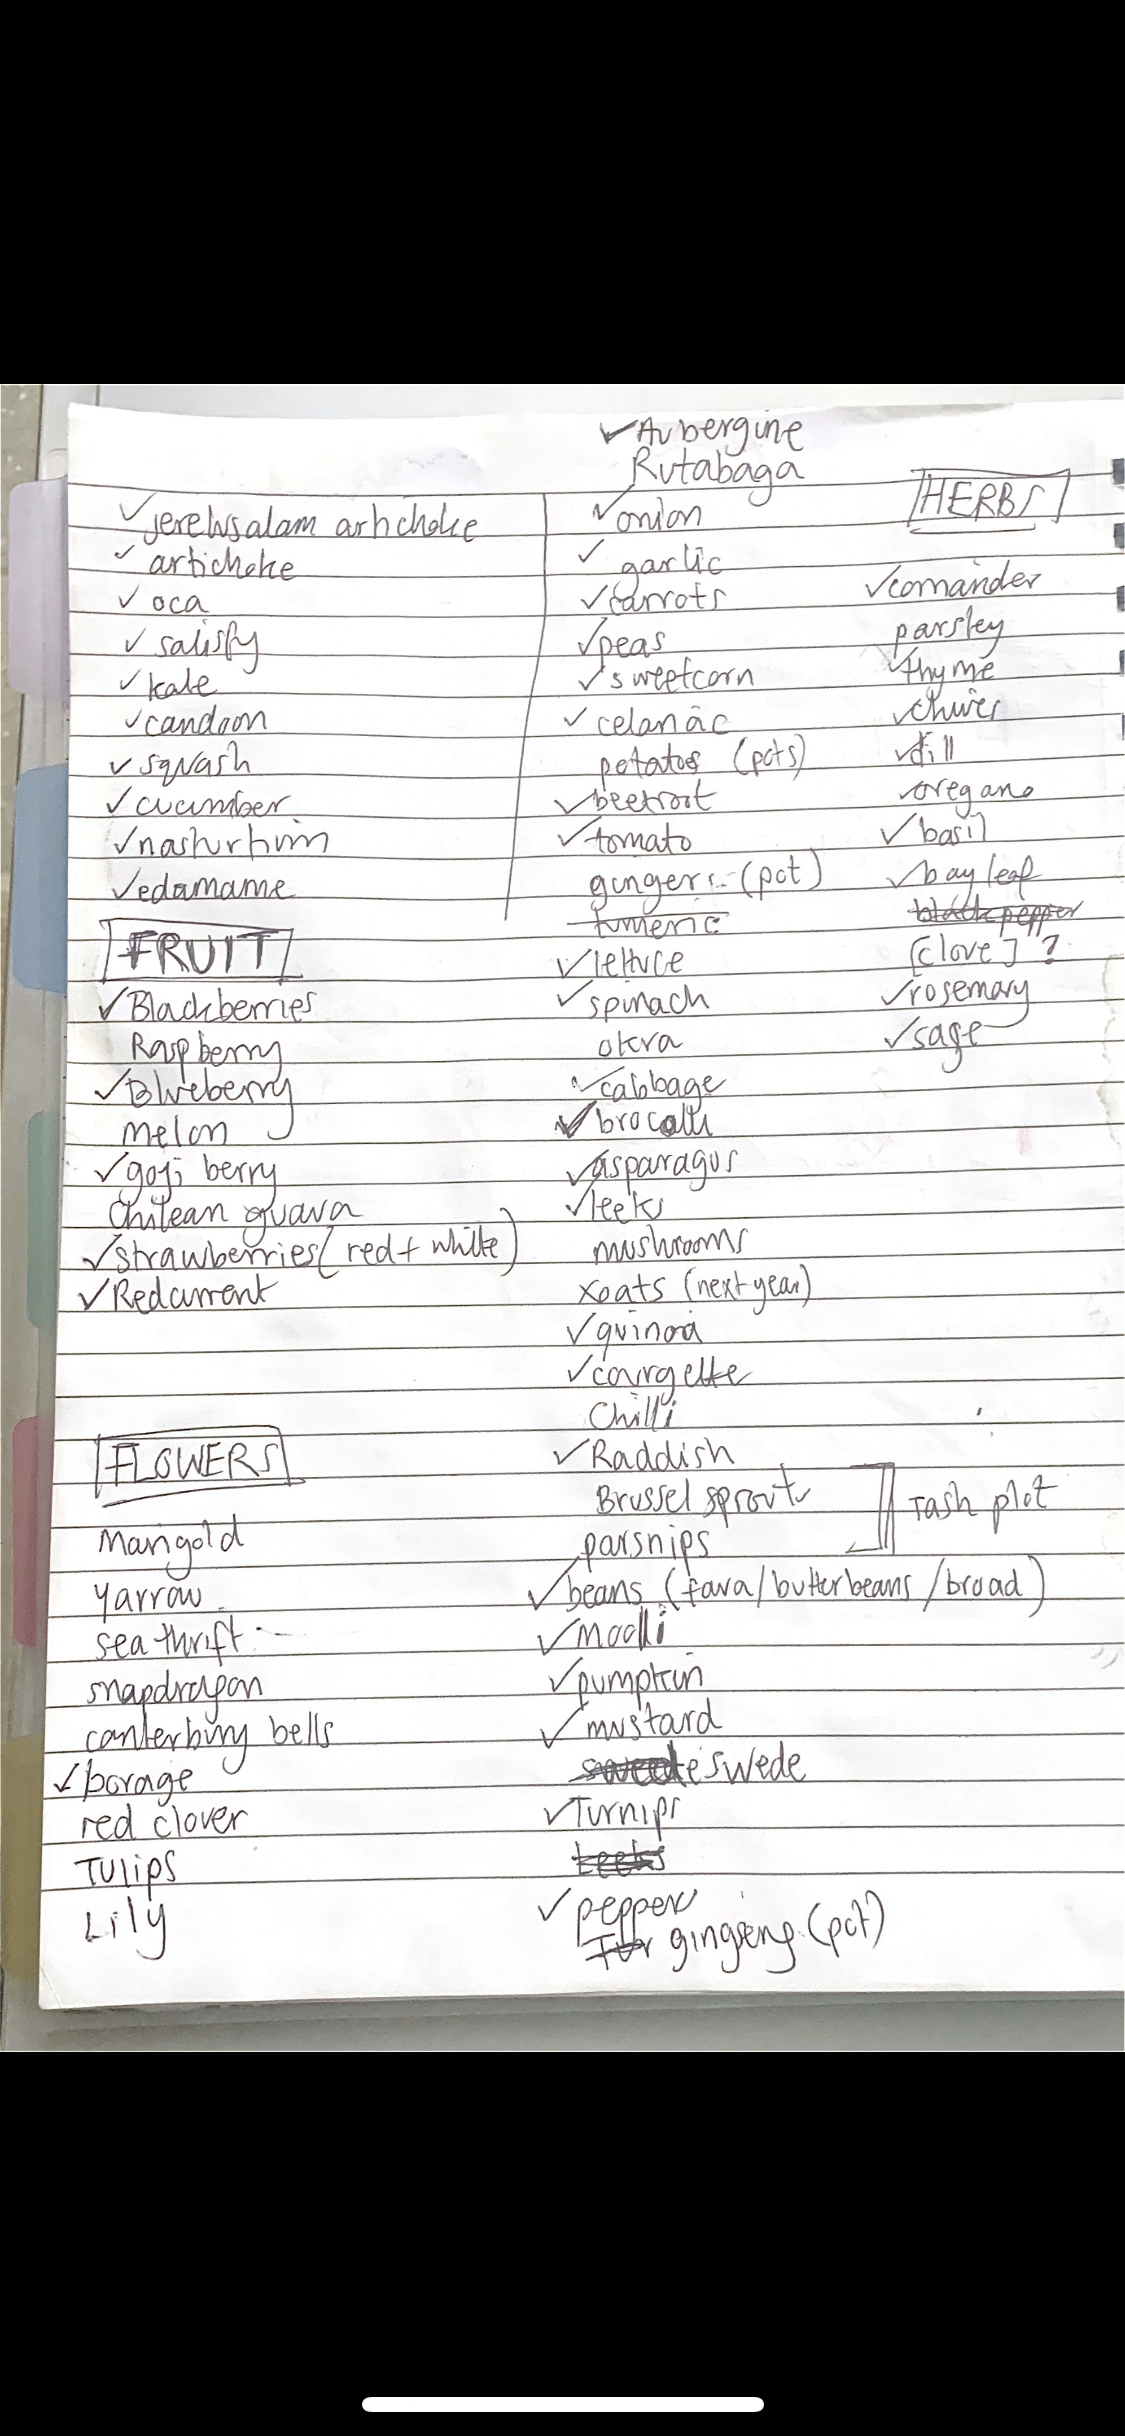
We measured both the top area and the bottom, and started a list of all the vegetables, herbs and flowers we wanted to grow. Carried out extensive google searches, book reading and trips to the garden centre to figure out what would be best to plant!
One of our favourite books was the RHS: Gardening through year- Month by Month. (you can pick a copy up here- https://www.amazon.co.uk/Gardening-Through-Year-Month-month/dp/0241315611/ref=zg_bs_271777_1?_encoding=UTF8&psc=1&refRID=TJKFPN5KN4KAVRQEJ043).
It was full to the brim with information, and good intelligent content. We have been trying to consult with it regularly just to check we are doing things at the right time, e.g. Pruning, seed sowing, taking cuttings, the best time to fertilisers & compost etc.
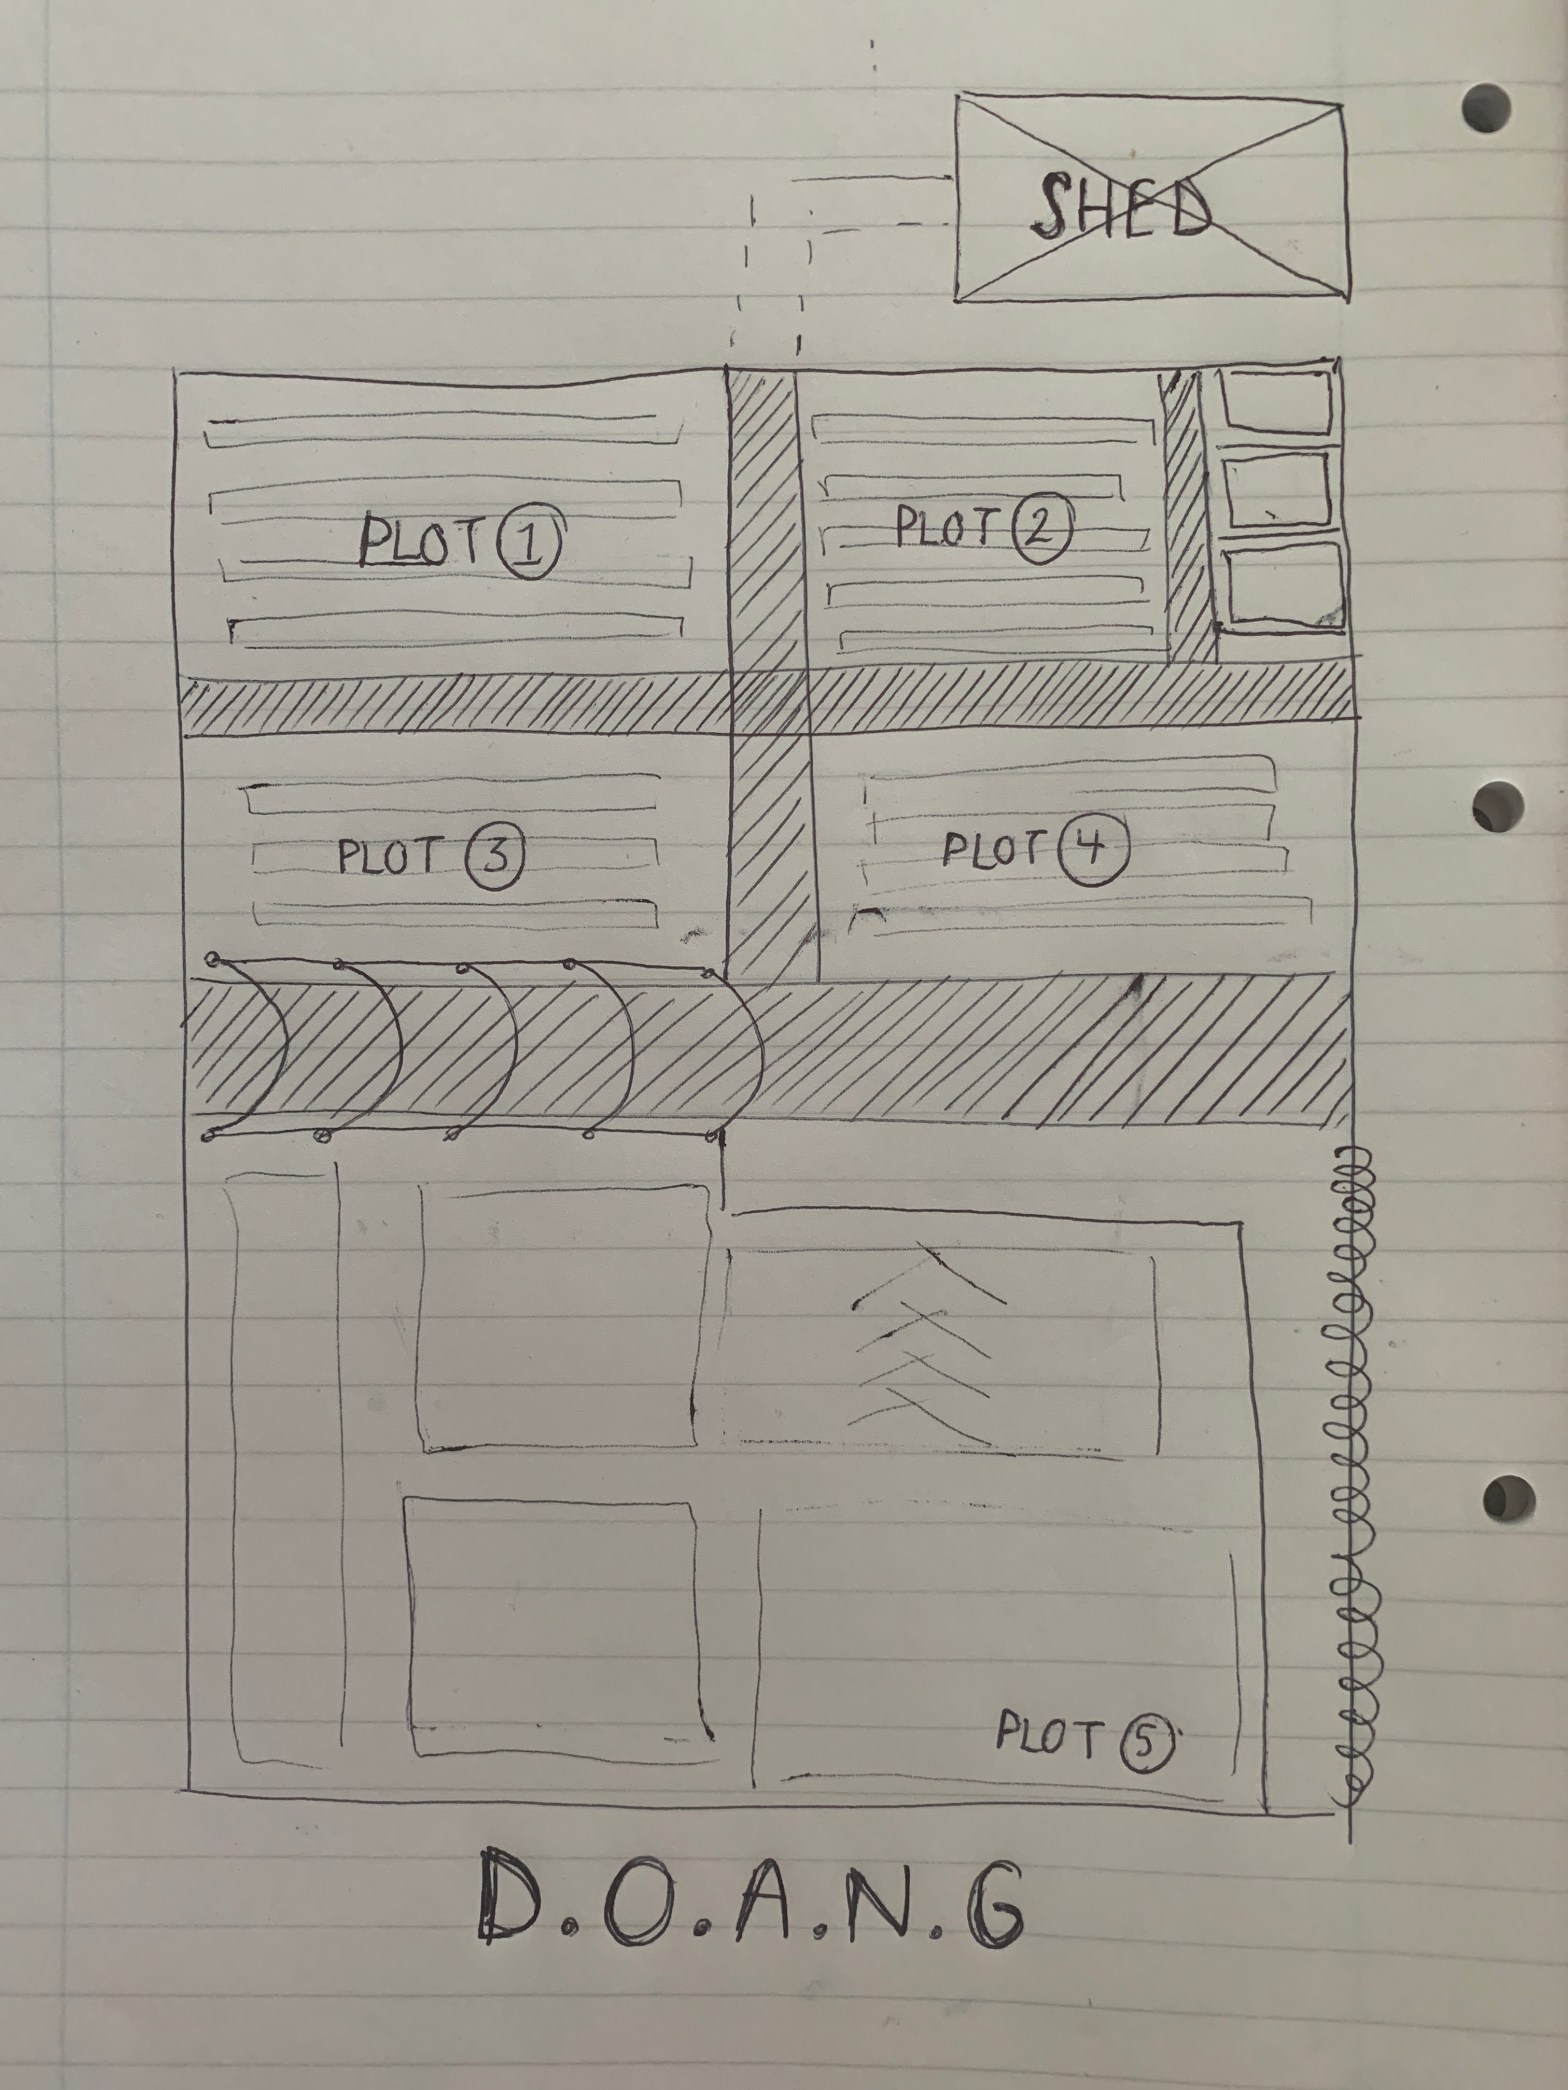
STAGE 3: DIVIDING THE PLOTS
We then divided the plots into the following:
Top Area – Logically as we watched the day progress, it made sense to split the plot into sections, as per the below;
- South Plot, sunny from early morning until early afternoon. This plot had decent exposure to the sun and was fairly far from any tree lines but closest to a fence.
- Shady Plot closest to the shed, early morning sun again but the first plot to fall into shade as it sits with a large oak tree behind the shed area.
- Sunny top plot, this plot sits North from plot 1 and as such is furthest away from trees and the fence. It enjoys the most sun in the Top Area.
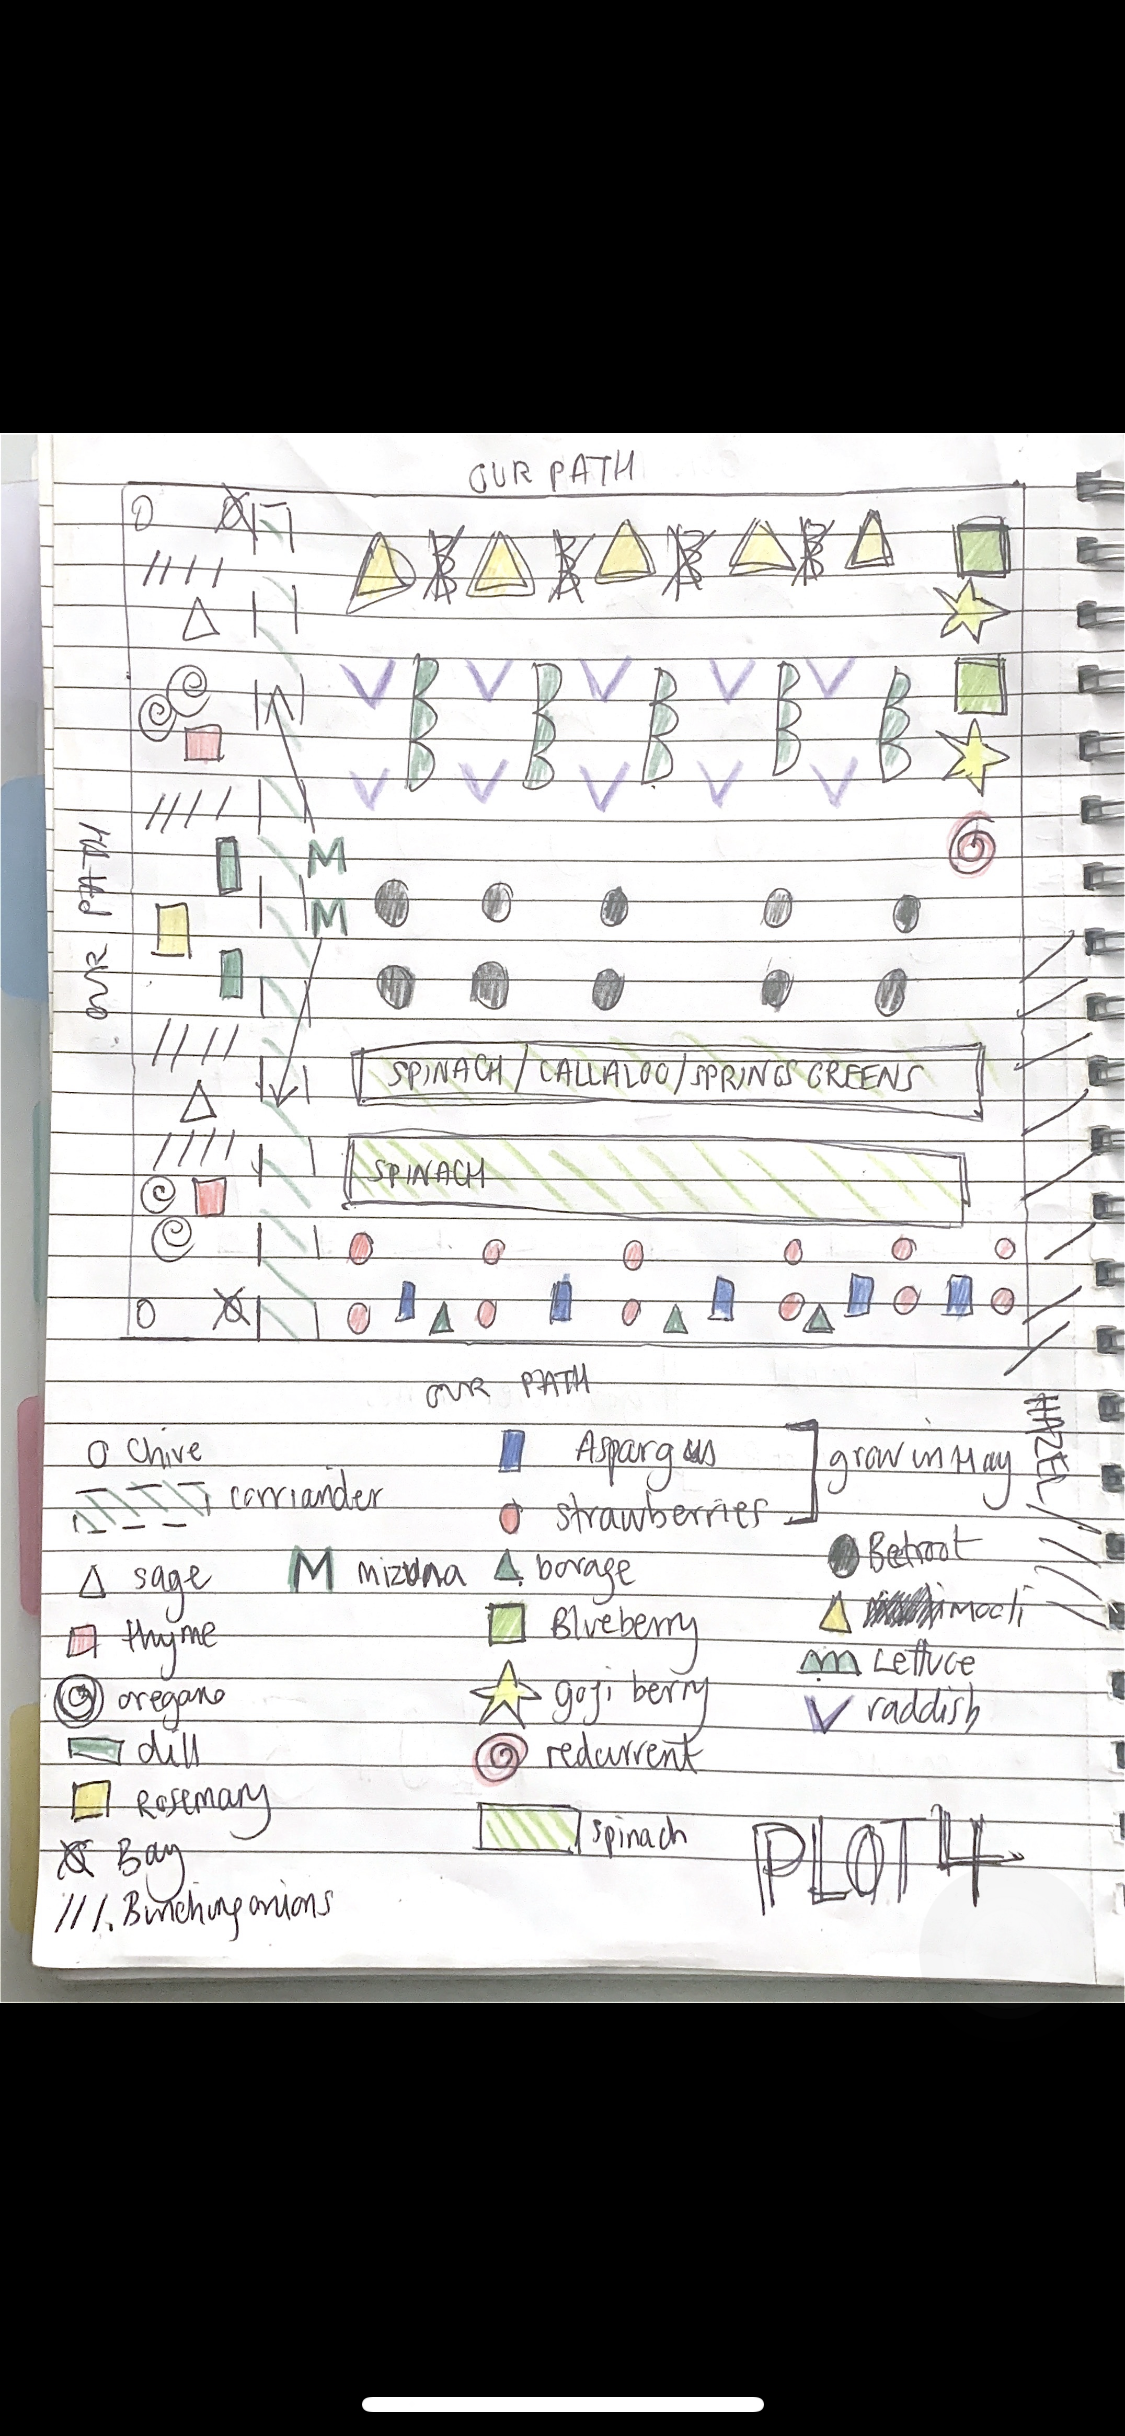
- Hazel Plot, this plot is close to an established Hazel tree, just north from the Shady Plot. As such it does enjoy some sun, but is the second plot to fall into shade.
Main Planting Area:
This main planting area was North from the “Top Area” and as the day progressed, we witnessed the shade move in from Top Plot 2, Top Plot 3, Top Plot 1 and finally Top Plot 4. By late afternoon in the main area, the majority of the plot is in the shade with the exception of the most northernly part. As such, the closest section to the top area would be described as “Sun/Partial Shade” and the furthest areas could be described as “Full Sun”.
STAGE 4: THE DECIDING FACTORS & CHOOSING THE PLANTS
After we split the areas into sections based on the sun, we could then think about splitting our plants into ones which needed full sun or could handle some shade. We chose plants which we wanted to grow and proceeded with some research into which plants grew well together [companion planting], and which ones we should be keeping apart!
This was a discussion which proceeded much longer than we expected. It was like trying to complete a jigsaw without any edges as we moved plants around and tried to keep plants away from others and thought about inter-planting others.
We sat together with our seed packets in a strange game of “Full sun/shade” kind of Top Trumps.
Thankfully, eventually we made our way through by following the simple idea. Perennial or Annual. We had found our Jigsaw edges.
Top Plot 4 was close to a hazel so we didn’t want to include any vegetables in which we were expecting to dig up any roots. It had decent exposure to the sun in its top area and partial shade was good for crops which do not do well in full sun. This became the start of the asparagus bed, strawberry bed and vegetable bed with small crops – to which, if they are exposed to too much sun, may end up bolting.
Top Plot 1 was far enough away from the tree line so any expectant root vegetables would end up in the plot and the majority of these enjoy a decent amount of sunshine.
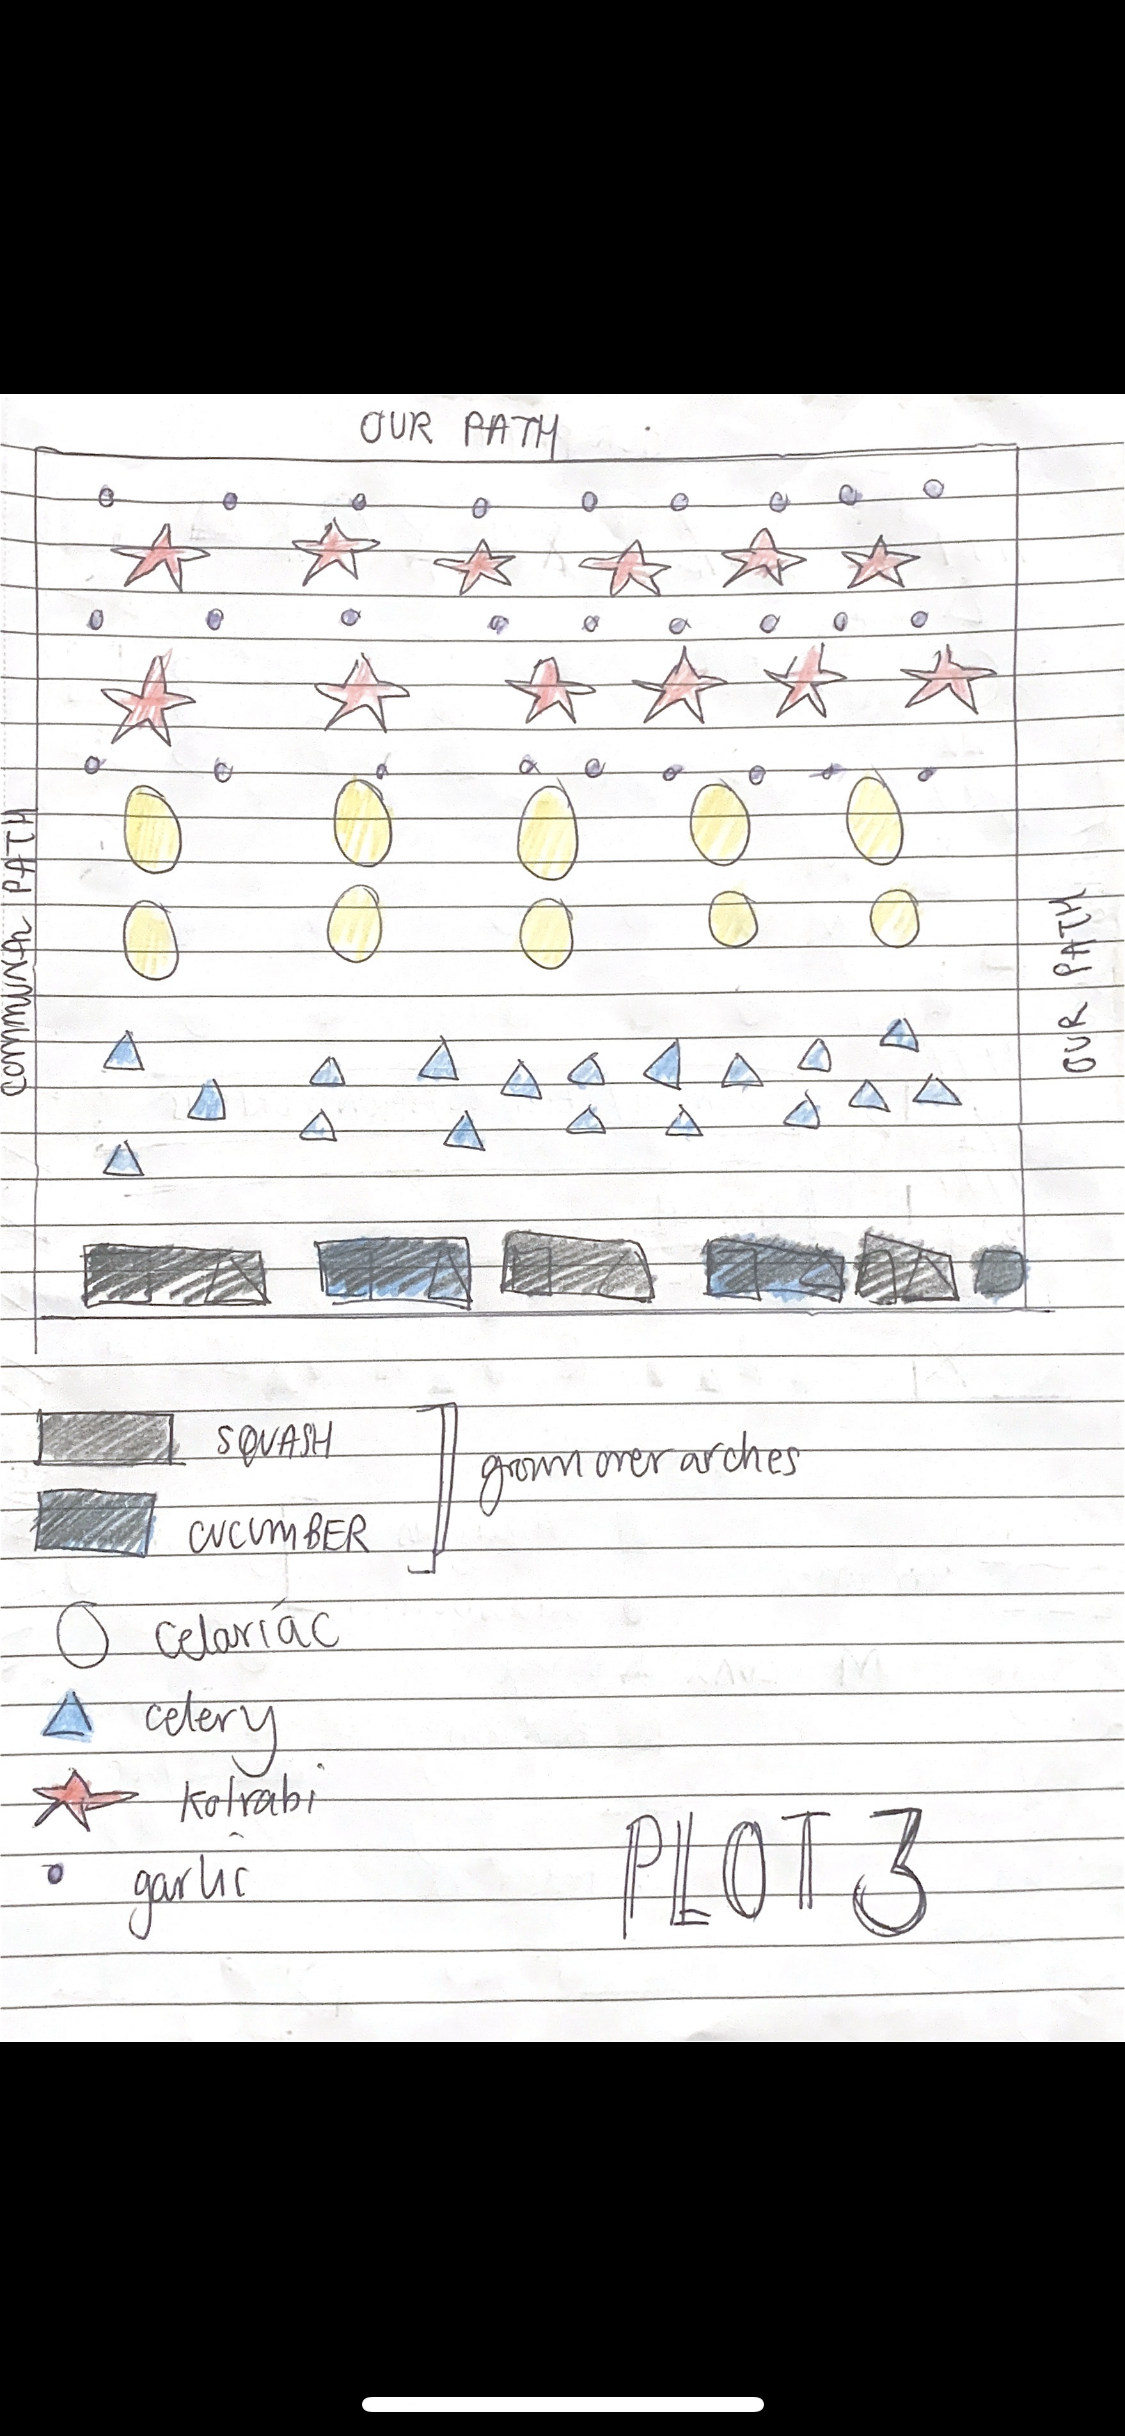
Top Plot 3 managed to receive the most sunshine and we decided to place an archway with climbing vegetables which will join with plants [hopefully] coming up from the main area.
This left Top plot 2. Top plot 2 was in the shade the majority of the time, it only really received some morning sun, it was close to a tree so we expected the ground to be completely full of roots and that knocked out any root vegetables. As such we decided this plot was going to be used for above ground flowers, plants which attract wildlife [especially bees] and possibly some form of fruit tree/bush.
In the Top Area as it was close to the shed, we wanted to mix in the majority of our Perennial planting, for yearly interest, as well as the occasional annual salad, our herbs and flowers.
The Main Area was where we were going to plant the majority of our annuals in rows running North to South so that each area receives as much sunlight as possible. We were going to include all of our sun loving crops from corn, tomatoes, cucumber, cabbage and broccoli to pumpkin.
Knowing the size of the areas and plots allowed us to work out some estimates on the numbers of plants required in each area based on how far apart they are supposed to live and eventually we got there!
Here are out first drawings of our separated plots and we are sure that there will be further tweaks along the way.


We are no experts, hopeful and of course over-ambitious [who isn’t] – Fingers crossed!
D.O.A.N.G

Interesting. I cannot find your “Follow” button!
LikeLiked by 1 person
How strange! There should be a follow button somewhere- I’ll have to contact WordPress if there’s not one showing! Thanks Paddy!
LikeLiked by 1 person
Ah, it popped up under your name with your reply. Many thanks.
LikeLiked by 1 person
It may have been there all the time, hiding in plain sight, but I didn’t spot it.
LikeLiked by 1 person
What an amazing plan you have! With such detail! I plot without plan 🙂 But mine is easy – furrows 😀
LikeLiked by 1 person
Thank you- it was a headache! Ha! We never usually have a plan but thought we would try it out this year in the hope of seeing how to work with a larger plot of land (and for how we could possibly have a veg/fruit farm one day – we are allowed to dream right?!🤣)
LikeLiked by 1 person
Yes!!! All starts from dream 🙂
LikeLiked by 1 person